|
General
•
Installation
•
First Gallery
•
Presets
•
EPGC
•
Part 2 »
General
The EOS HTML template can be used with photools' IMatch 3.4. We have tested it with version 3.4.0.34. Before you start using the EOS template you should get comfortable in generating web galleries with IMatch. You can access the help page if you choose:
Help → Content... and then HTML and the World Wide Web with IMatch
There is also special help page available which is not part of the manual. You can access it if you click on the "Show Script Help..." in the Photo Gallery Creator window.
If you have a specific question regarding the application itself (not EOS related) then please post to the Photools user forum. It is monitored by the developer, Mario Westphal.
Installing the Template
The installation requires two steps and is very simple. All you have to do is to download two ZIP files and extract their content in the right place.
The files are named eos_common_v25.zip and eos_v25_imatch.zip and can be downloaded from the Yahoo! group's Files section. It's important that their folder structure is still intact after the extraction!
Note that there is another file available, named eos_v25_imatch_ext.zip. That is an enhanced version for the extended Photo Gallery Creator (EPGC or jfPGC) - more on that later.
Common Files
Now you have two folders named "galleries" and "EOS". The first one is your EOS project folder and can be moved to wherever you like. It only contains the "eoscommon" folder. Later it will be the place where all your web galleries reside. There is more information if you click the link above but it is not essential that you read it before you create your first gallery. Example setup:
C:\www\galleries\
Template Files
The next step is to install the "EOS" folder. Locate the IMatch installation directory and move the "EOS" folder into the subfolder scripts\WebGallery. The EOS template will then appear as choice within the Photo Gallery Creator. Example path:
C:\Program Files\photools.com\IMatch\scripts\WebGallery\EOS\
Template files are files which get scanned by the gallery creator. Tokens get replaced and rules will be applied to build a complete HTML gallery. There exists only one copy per template file in the template folder. However during the HTML generation process the image template gets applied to every image in your gallery, resulting in multiple image files (one per image) in the output folder.
Template
File Type
| IMatch
Generator Type
| File name in the
Template Folder
| File name(s) in
Output Folder
| Amount
|
| frame
| ParsePage
| index.html
| index.html
| 1
|
| index
| NavigationPage
| index2.html
| index2.html
| 1
|
| image
| ImagePage
| image.html
| image<nr.>.html
| one per
image
|
| navigation
| PageControl
| image.js
| image<nr.>.js
| one per
image
|
Don't worry if these names sound greek to you. It will make sense once you created some galleries...
Your first Gallery
The installation is now completed and you can generate your first gallery. You must select at least one image before you start the Photo Gallery Creator! If no image is selected the gallery will not work. Afterwards start the PGC as shown in the screenshot below:

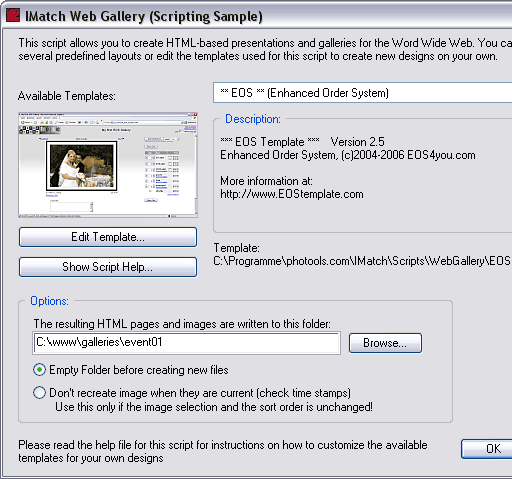
The following window appears:

Choose ** EOS ** (Enhanced Order System) from the list of Available Templates. In the Options section enter a new directory within your EOS project folder as your output folder. In the sample above the output folder is called "event01".
Now click on "OK" and the gallery will be created. After that go to your output folder and double click on the file "index.html". You default browser will open and load the gallery.
Presets
The Photo Gallery Creator offers some simple Gallery Settings which are called Presets. You can change them when you click on Edit Template... on the PGC window (see screenshow above). Your default text editor will open and show the text file. Read below what you may change:
HeaderHeight=60
That is the height of the top frame in pixels. Leave it at 60 unless you want to show a bigger logo image.
Title=Test Gallery
Enter here the title of your gallery. It show up in the window frame, the page header and in the order.
GalleryID=none
This variable can contain any ID you would like to attach to your gallery. It will be invisible to your client but can be used to group your orders. One day you scroll through a list of your orders and might want to sort them by event date (for example). That's what this field is for.
ImageList=image:450
The maximul size in pixles of your main websized images.
ImageList=thumb:125
The maximum size in pixels of the thumbnail images.
ImageQuality=30
Here you can define the level of JPG compression for your images. Values can be between 0 and 255, where 0 is the best quality (no compression) but also the biggest file size.
SortPreset=Standard
The variable can be "Standard" or "LightTable". Whatever your preferred IMatch sort order is.
Now make some changes and regenerate the gallery. If you select "Don't recreate image..." the process wil be much quicker than in the first run but the images won't get updated. After that hit the Reload button in your browser and the changes will show up.
Extended Photo Gallery Creator (EPGC)
So far so good. But IMatch can do it better, much better... Unfortunately not with the standard Photo Gallery Creator. Therefore I highly recommend to install the free Extended Photo Gallery Creator! You can download the EPGC from Jürgen Failenschmid's homepage at projects.anycpu.com/photogallery. The EPGC (or "jfPGC", named after it's developer) offers some essential features for every photographer. The most important ones are:
- apply an unsharp mask (the difference is like day & night!)
- add a copyright text as watermark to your image
- line breaks in the caption text do not corrupt the gallery code
- use subfolders for images and thumbnails in the output folder
- hide your images behind a transparent GIF image
What does that mean for the EOS template? Throw away the the template you have just installed! Yes, EPGC is that good. Download the file eos_v25_imatch_ext.zip from the Yahoo! group's Files section and install it like you did with the standard EOS template. The resulting template folder is named "EOS for jfPGC" by default so it does not interfere with the standard template.
Now see if the new template is available in the IMatch script's collection:

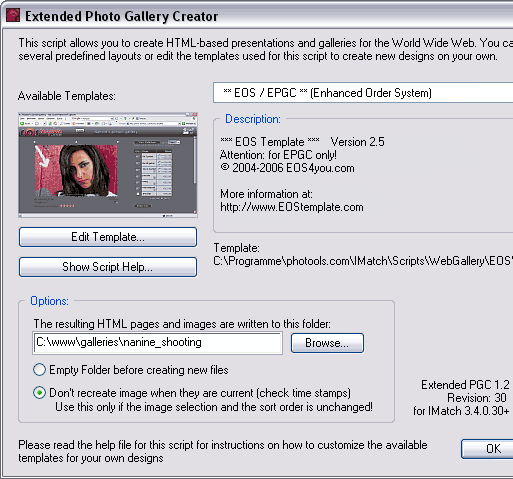
Note that the jfPCG can be found under "My Scripts" if you have installed it in the scripts\user folder instead of the scripts\WebGallery one. Both locations are fine. If you open the jfPGC the window will look like this:

Choose ** EOS / EPGC ** (Enhanced Order System) from the list of Available Templates. Note that the small sample image is different to the standard EOS template so you can quickly see if you have loaded the correct one. As I have mentioned before feel free to delete the previous EOS template folder. It has no advantage once you have EPGC installed.
Note that the extended EOS template does not work with the standard PGC.
It requires EPGC!
If you click on "Edit Template..." your default text editor will open the Presets for the extended EOS template. It offers the following enhanced settings compared to the standard EOS template:
Copyright=© {Application.Year} by My Name Here
With this variable you can define a copyright notice which will be shown as watermark in your image. Since it allows to use IMatch variables you can also display the filename or date & time of the shot in the image.
ImageList=images/image:450:quality=20:postResize=....

	      ImageList=thumbs/thumb:125:quality=15:postResize=....
The controls for the images has been significantly improved. Feel free to change the values for the image sizes or quality. Check the documentation for a list of all available features. Note that the sharpening values are set to give optimum results. Do not edit the subfolder names "images" and "thumbs"!
Now generate a new gallery and enjoy it's improvements. If you like what you see then go to Jürgen's homepage and make a donation for his efforts.
What's next?
Locate your EOS project folder, named "galleries" in the example, and upload it to your website. If you place it in the top folder on your seb server then you can access it with your browser using an address like this one:
http://www.mywebserver.com/galleries/event01
Once you got that far you can r e l a x . From now on we are able to support you over the web and clean up any mess you might have made during the customization process...
The next step is to explore the EOS settings file in the "eoscommon" folder and make some simple changes. Read the customization intro for more information. Reload the gallery in your browser to see your changes and you're right into the customization process. Note that there are some very helpful scripts in the "help" subfolder. It's also a good idea to have a look at the FAQ (only for clients). It's highly recommended that you read the first entries, marked with BEGINNER. It will save you a lot of time in case you have to deal with a script error.
Part 2 of the Getting Started article will show you how to control the EOS template with IPTC metadata.
Top
|