|
General
•
Installation
•
HTML Tips
•
Captions
•
Special items
•
Sections
HTML window
•
HTML settings
•
Template files
•
assets files
•
Regeneration
General
The EOS template can be used with iView MediaPro 2 (or higher). If you use iView MediaPro 3 then please follow this link!
Before you start working with the template you should get comfortable with generating web galleries in iView. Check the iView PDF documentation for more information. In addition there is a special Help file available: → Documents/English/Examples HTML/About_templates.html. If you have a specific question regarding the application itself (not EOS related) then please post to the iView Multimedia forum. Though this is not a support forum you should get help from other users or the iView staff.
Installation for iView MediaPro
You can download the template file from the Yahoo! group's Files section. After extracting the ZIP file you must copy the EOS folder into the HTML Templates directory of your iView installation.
- Mac OS 9:
→ System Folder/Application Support/iView/Plug-ins/HTML Templates/
- Mac OS X:
→ ~User/Library/Application Support/iView/Plug-ins/HTML Templates/
or
→ Network/Library/Application Support/iView/Plug-ins/HTML Templates/
- Windows:
→ Program files\iView MediaPro\Plug-ins\HTML Templates\
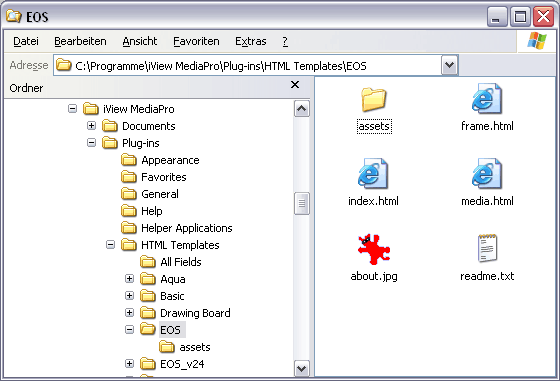
Make sure that the subdirectory "assets" exists in the EOS folder. Sometimes this structure gets lost when you do not use a proper unzip tool. Note that you can rename the EOS folder without affecting the functionality. That means you can install multiple versions of the EOS template if you like.
iView sometimes uses the term themes instead of templates. Don't be confused, it's the same thing.
Important:
The template is now installed. But you cannot create a gallery yet if you use the template version 2.5 (or higher). That's because in that version a shared settings concept has been introduced. Please read 'How to set up an EOS project' now. Then come back to read some tips for the gallery generation with iView.
HTML generation tips
You should be familiar with iView MediaPro's gallery generation feature. If not, please read the iView documentation first. There are some special tasks necessary before you start making the HTML gallery, see below.
If you use v2.4 (and lower) of the EOS template you need to create a new directory (anywhere) and copy all files from the folder "copy_these_files" to the new directory. This will be the output directory. If you use v2.5 (and higher) this step can be omitted, since the additional files are already in the shared folder of the EOS project.
Now start iView Media Pro2 and select a Catalog (or create one). You can sort the images using drag & drop. Note that all visible images will be used for the web gallery. If you want to show only a subset then select the images of your choice and then select "Show Selected" from the Find menu. Now only the selected ones are visible and will show up in the web gallery.
Add Image Captions
If you want to add image descriptions then you have to write the text in the Caption field. See the screenshot below for an example. The position of the caption text in the gallery can be defined in the EOS settings file.
Note that all special characters will get replaced with HTML conform entities.
Examples are:
< will become <
> will become >
" will become "
That means you cannot use HTML code in the caption text. But there is an alternative: The substitution process will not take place if you check "Treat captions as raw HTML" in the HTML settings window. Just make sure that you do not use double quotes in that case or if you do then write a backslash in front: \"
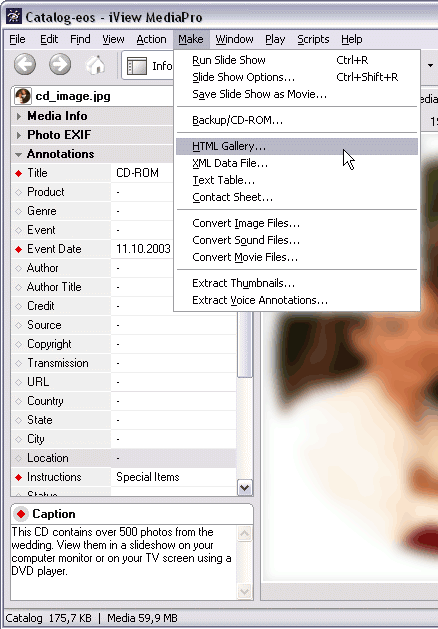
Define Special Items
Usually each photo is shown with a fixed set of items (e.g. print sizes). Sometimes it is necessary to add a special item to the list, like a bigger print size for very sharp photos. It is also possible to show a completely different set of items for a photo. These so-called "special items" are setup in the EOS template settings and won't be explained here in detail. However it is necessary to store a piece of information within the image data to tell the template which items should get displayed for this photo. This is done using the Annotations field "Title". The screenshot above shows the special item "CD-ROM" defined. More information regarding Special Items can be found in the F.A.Q. in the Yahoo! group.
Note that in other applications these text fields are called IPTC data. Annotations is an iView proprietary term.
Create Sections
Sections are nothing but a different way of navigation. You can also call them sub-galleries, topics or chapters. Instead of showing the thumbnails on several pages you can split the gallery into different sections. You can offer the page navigation as well or just the sections. The best thing is that a section overview page is automatically generated, showing the first image of each section, it's title and the amount of photos within the sections.
Here is how it is done: order the images in iView by the topic you want to use as sections (can be events, locations, names, date, time, e.t.c.). Then select all images of one topic and enter the section name in the Annotations field "Instructions". If you have filled out the section names for all photos you are ready to (re-)generate the gallery. Just make sure that the variable "useSections" is set to 1 or 2 in the EOS settings (filename "settings.js").
In the screenshot above you will see that the section name "Special items" was entered for the CD image. That means all images with that section title will be shown in a virtual subfolder called "Special items".
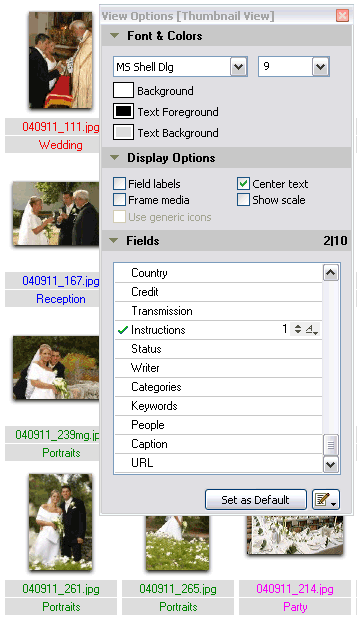
If you work with sections I recommend to display the Instructions value below the thumbnails. That give a better overview. In the screenshot below I have used different color labels for better visibility. Labels are not related to sections.
HTML Dialog Window
Note that the previous mentioned tips are completely optional! You can also start the web gallery generator right after you have downloaded the photos to your computer.
The next step is to open the HTML window: Make → HTML Gallery... A window similar to the one below will appear:
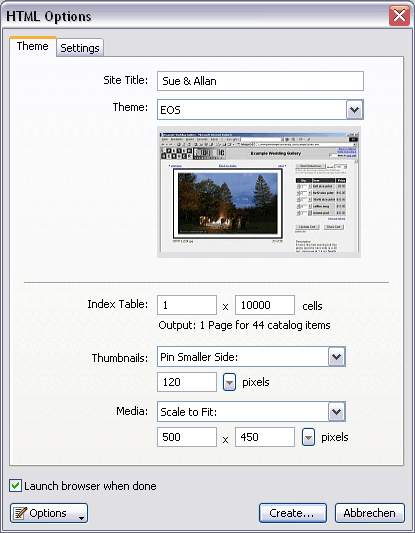
Here you can enter a Site Title (used for this gallery) at the top. Alternatively you can use the folder name as title (requires to modify the EOS settings, v2.5 only).
Don't forget to choose the EOS template from the list of themes.
Note: Leave the Index Table settings at their default values! It is necessary for the EOS template to work properly. You can set the index cell layout in the EOS settings instead.
Now click on "Create..." and a window will pop up which asks you for the output folder. Enter your EOS project folder plus a gallery folder name of your choice. If you use an EOS template version prior to 2.5 you need to enter the output folder which you have already created (remember the "copy_these_files" step from above?).
Click on "OK" and start the process. The output directory will be created (if it does not exists) and all files from the EOS template folder "assets" will be copied as well. The gallery will be shown in a new browser window.
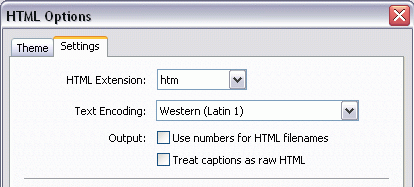
HTML Settings
Usually it is not necessary to make changes in the HTML settings window for the EOS template. Just make sure that the extension is set to either htm or html. Furthermore it is not recommended to treat captions as raw HTML. The advantage is that you can add HTML code in the image description but the huge disadvantage is that the Javascript code gets corrupted when you use the wrong quotes in the captional text. See also the paragraph "Add image captions" above.
Furthermore you can set the JPG quality of the web sized images and add a watermark image.
Template Files
Template files are files which get scanned by the HTML generator. The field phrases get replaced and rules will be applied to build a complete HTML gallery. There exists only one copy per template file in the template folder. However during the HTML generation process the image template gets applied to every image in your gallery, resulting in multiple image files (one per image) in the output folder.
Template
Type
| File name in
Template Folder
| File name(s) in
Output Folder
| Amount
|
| frame
| frame.html
| index.htm
| 1
|
| index
| index.html
| index1.htm
| 1
|
| image
| media.html
| source/<image-name>.htm
| one per
image
|
Additional Files in the "assets" subfolder
Up to the EOS template version 2.4 the "assets" folder was empty. Instead you needed to copy manually all files from the folder "copy_these_files" into the output directory.
Since version 2.5 most of these files can be found in the shared folder "eoscommon". However, a few gallery specific files are now in the "assets" subfolder. They get copied unchanged to the output directory in the subfolder "source/assets/".
Note:
Do not change the filenames! Unfortunately iView requires to hardcode the filenames in the template. If you change the filename it won't get copied to the output folder. If you really want to change the name of the files "cc.js" and/or "passw.js" then you need to open the file "media.html" in a text editor and change the filename there as well (lines 10-14). Of course you also have to edit the appropriate variables in the settings file: pwFile and ccFile.
Regenerate the Gallery
You need to re-generate the gallery when you make changes in...
- ... the image order.
- ... the image file names.
- ... the image selection (add or omit some).
- ... the Annotations data of the images.
- ... the HTML settings, like title, size, watermark or quality.
- ... any of the three EOS template files (see above).
If you edit a file in the EOS template "assets" subfolder you have copy the file to the "source/assets/" subfolder in the output directory afterwards. Regenerating the gallery would have the the same effect but it takes takes too long. Of course, you can also edit the file directly in the "source/assets/" subfolder in output directory but if you forget to copy it back to the input folder your changes will be lost after the next regeneration of the gallery. Changes in the "eoscommon" folder (v2.5) can be made any time and do not require a regeneration.
Note that always a new gallery is created and all existing data will be overwritten. iView is not able to use the available images, like other applications do. This can be a real pain when you need to regenerate a gallery. If your gallery has several hundred images it can take hours where other applications only needs a few seconds for the same task.
Top
|